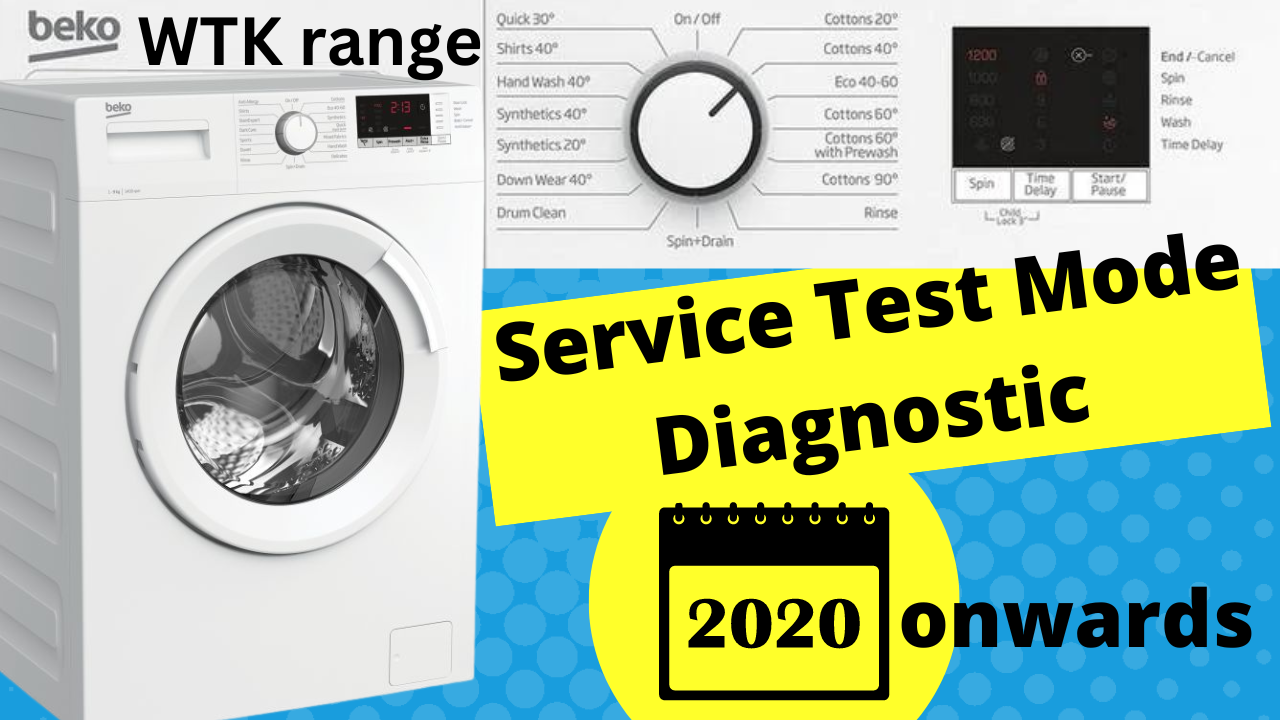
Beko WTK washing machine service test mode and diagnostic 2020 onwards
Beko Washing Machine Spare Parts

Important notice on Beko
Before entering test mode please be aware that you are not meant to leave the washing machine Unattended. There is a chance the machine can overfill when testing the water valves or the Machine could overheat when testing the heater. Also when entering the test mode make sure the drum is empty as not to cause damage when on spin mode:
Test Mode Sequence
To enter test mode. Due to the manual being hard to read please note all manufacturing notes are in formatted text:
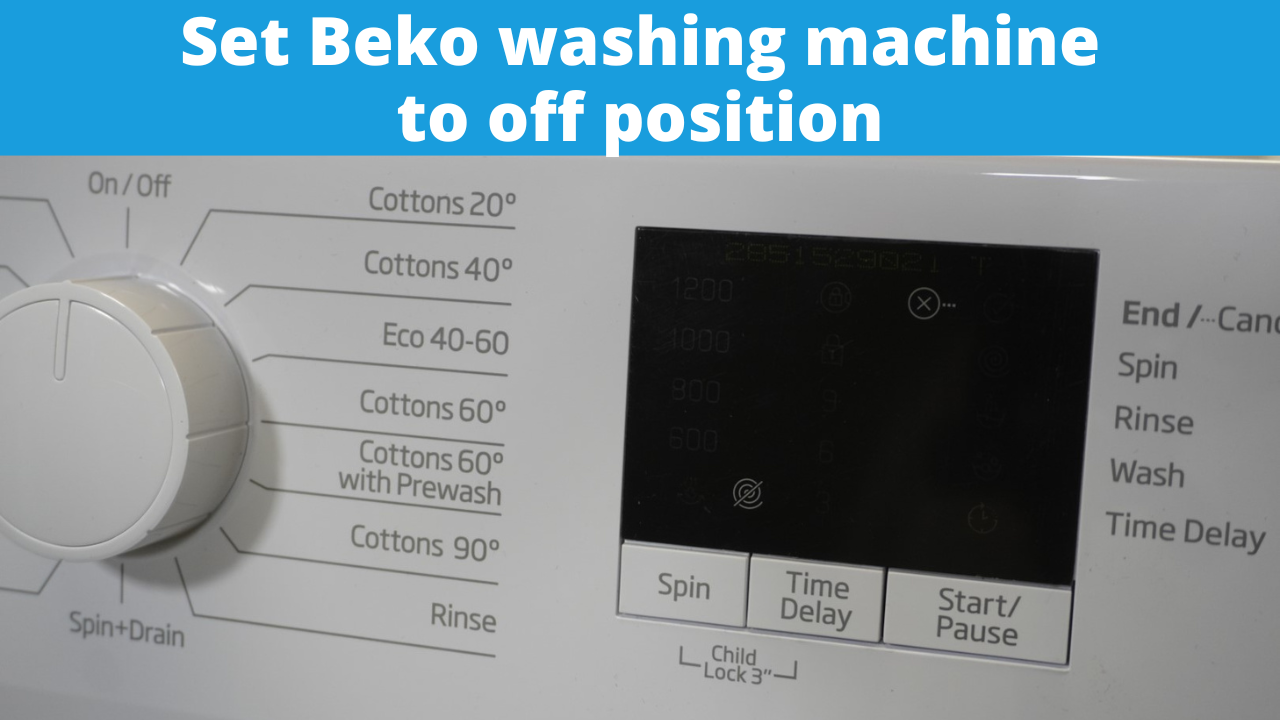
It is advisable that the washing machine be switched off for at least 5 minutes prior to entering test mode.
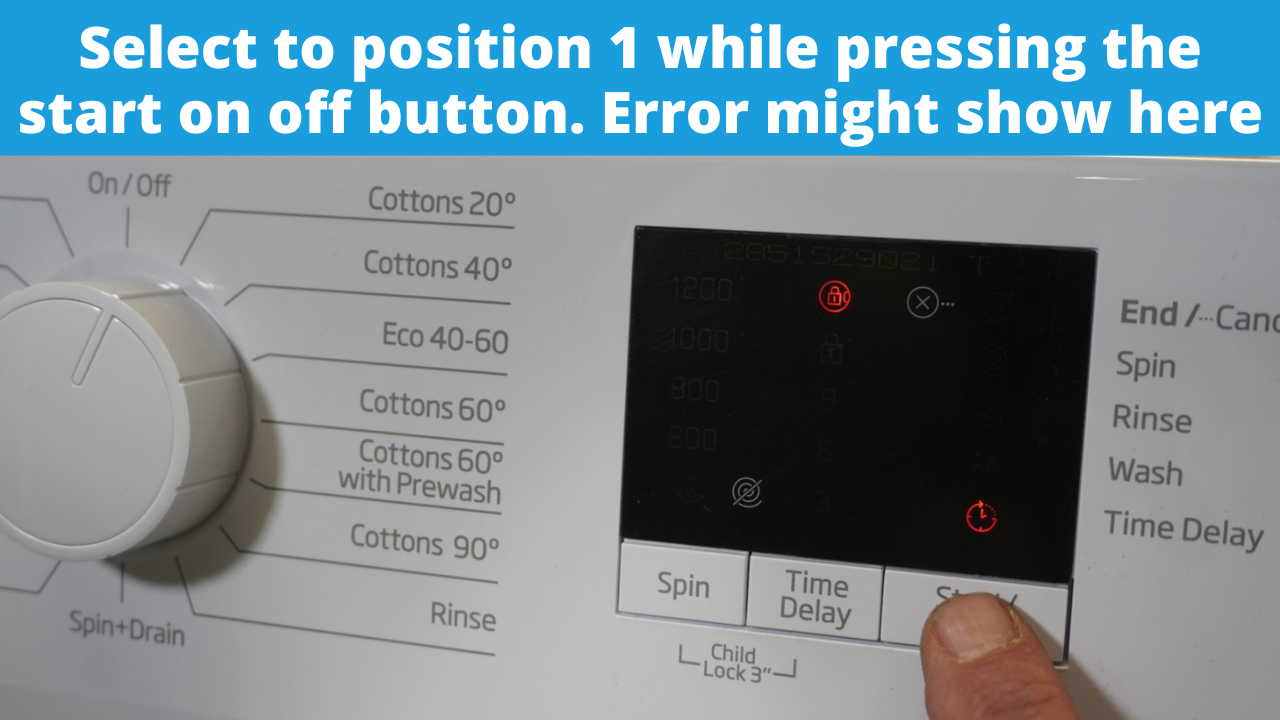
With the machine switched off shut the door and turn the dial to the 12 o'clock position. Then turn the dial to the first position while holding the start-stop button for 3 seconds, and you will see that the door lock will come on and display the panel.
Now that you've entered the Diagnostic/test mode, remember every time you press the start/pause button this will be one advance the program to a new test.
B7S ARCD Service Mode Steps:
The following points must be considered in the service test:
Method to Enter the Service Mode:
Press and hold "Start/Pause" for 3 seconds and at the same time, set the Rotary button to the next first programme by turning it clockwise in the "ON/OFF"
position to enter the "Service" mode.
To ensure that the components checked in each step of the Service mode can be activated, the door must be locked mechanically, i.e., power must be
supplied to the components. For example, to ensure that the motor can rotate, the door must be locked; in other words, motor must be powered.
Once you have entered the service mode,if the door contact is not closed for any reason (if the door lock or its triac is faulty), in other words, if the
driven components (heater, motor, pump, etc.) are not powered although the electronic cam is supplied with power,
a) For models with LED: "Ready" ins installed and the LED is turned on steadily. In the meantime, if EEPROM has an "Error Code", it
is coded in the "Speed Level" LEDs (on a decimal basis (in BCD format)) If there is no error, all "Speed Level" LEDs
will be off.
Furthermore, if the "Start/Pause" key is pressed, the above-mentioned process will remain the same and since the door is not actually locked, it will be
impossible to proceed in the "Service Mode" steps; the "Error Code" display step will remain active.
b) For 7S models: If the EEPROM has an "Error Code", it is shown as "E??" in the 7S display. If there is no error, the 7S display
will show "E--".
Furthermore, if the "Start/Pause" key is pressed, the above-mentioned process will remain the same and since the door is not actually locked, it will be
impossible to proceed in the "Service Mode" steps; the Error Coode" display step will remain active.
In any step of the service test, if the machine's power is cut off for any reason (with "ON/OFF" or as a result of power failure), the washing machine will
return to "Selection Mode" once the power is restored.
If you wait more than 2 minutes in any step of the service test, the washing machine will return to selection mode.
In the service mode, the start/stop key is pressed toactivate the components one by one. Respectively:
1)
The "Error Code" that was created at the first entry, the one that was created last and the one stored in EEPROM are displayed.
While the "Error Code" is being displayed, the following points must be considered:
For 7S models,
if there is an "Error Code", the corresponding value of this code on the decimal basis (in BCD format) is shown with an "E" at the beginning on the 7S
display. For example, "E09" or "E13"
If there is no "Error Code", "E--" is shown on 7S.
II For LED models only
If there is an "Error Code" the value corresponding to this code on the decimal basis (in BCD format) is coded to the "Spin Level LEDs", which are fixed
for all display types. When coding, from the bottom to the top, the digit weight must be as follows respectively: 2°=1. 2'=2. 2
2
=4. 2
3=
8. 2
4
=16. Accordingly, if the
"Error Code" is "08" the bottom 1st and 2nd spin LEDs will be turned on, others will be turned off. If the "Error Code" is "08' only the bottom 4th
spinning LED is turned on, others will be turned off.
If there is no "Error Code" all spinning LEDs must be off.
Press "Start/Pause" to proceed to the next step.
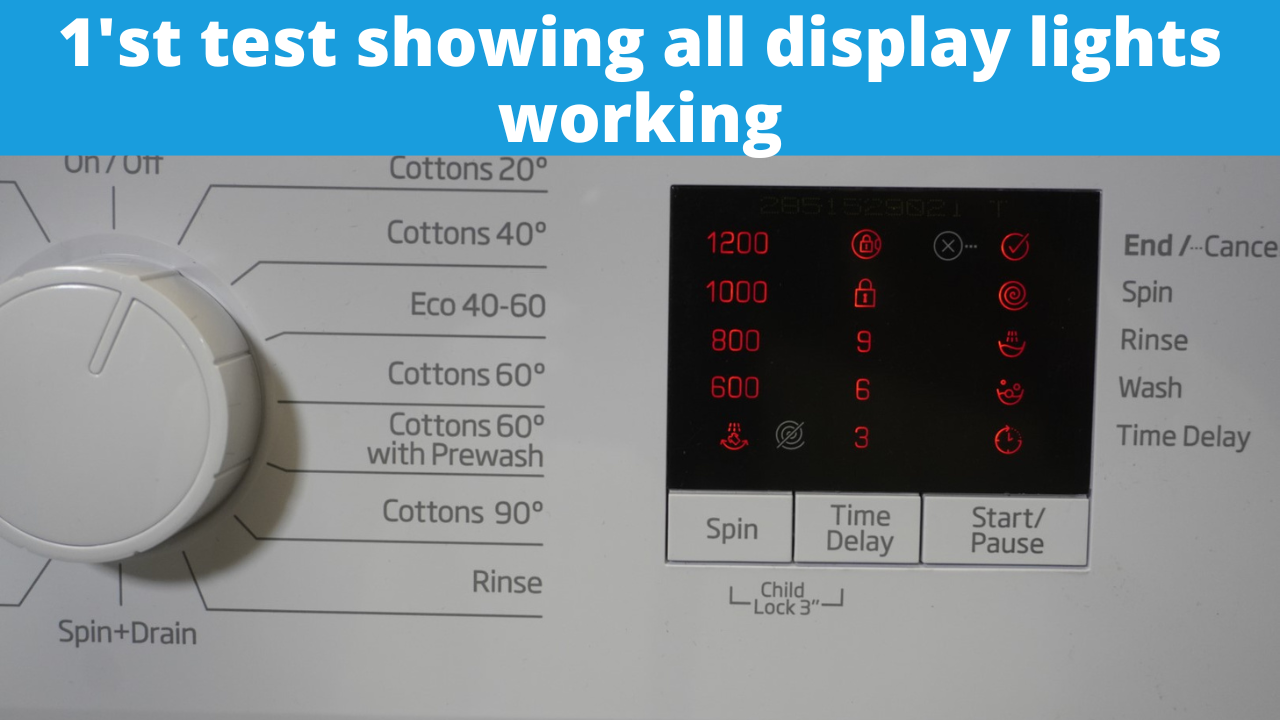
All the display lights or leds will flash to check that they are working and the door will now be locked.
2)The "Error Code" and other information stored in EEPROM(where to resume) will be erased from EEPROM
For 7S models, the 3-digit software version will be shown on the display and the "Start/Pause" key is pressed to proceed to the next step.
v For only LED models, the next step starts automatically(without the need to press ''Start/Pause'')
3)
For 7S, all segments and all LEDs are turned on and off to do the "Display" test. When the 'Start/Pause' key is pressed, all segments of 7S and all the LEDs
are turned off to end the 'Display' test and the next step is started:
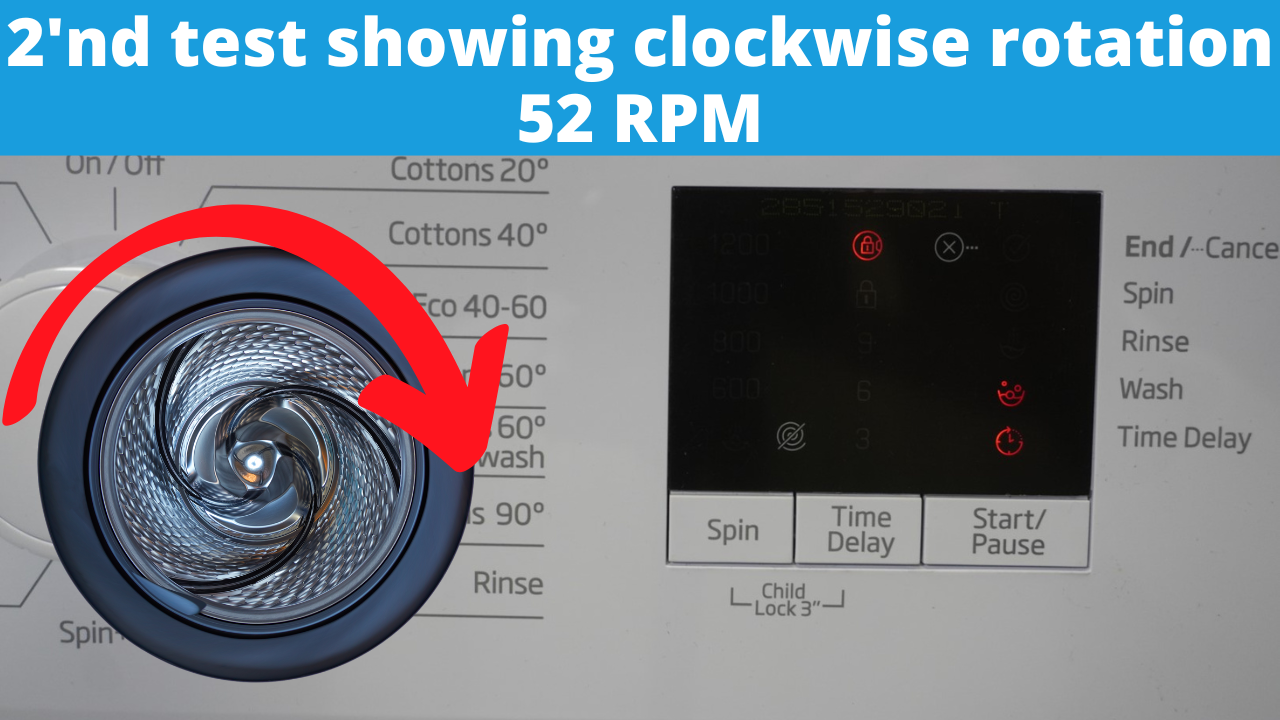
The drum does a clockwise rotation
4) It is rotated to the right (clockwise) by (CW) 52 rpm. In the meantime, in 7S models, "service mode step number" of this step, which is 4", is displayed. For LED models, above the "Start/Pause " key, the bottom 3rd LED of the "Programme Follow-up LEDs" is turned on (digit weights from the bottom to the top are as follows: 2°=1. 2 1 =2. 2 2 =4. 2 3 =8. 2 4 =16). "Start/Pause" is pressed to proceed to the next step
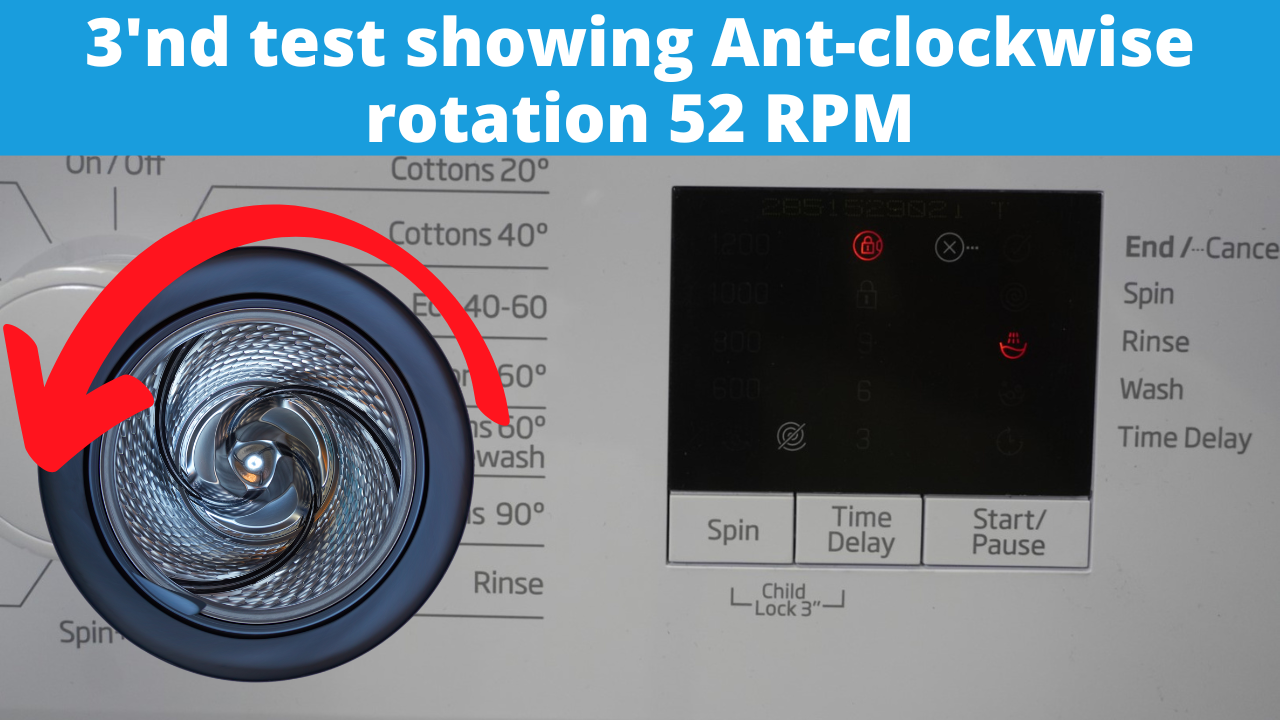
Drum rotates the anticlockwise rotation
5)
Rotate to left by 52 rpm. In the meantime, on
7Smodels, on the display, "service mode step number" of this step, which is "5" is shown.
For LED models, above the "Start/Pause" key, from the "Programme Follow-up LEDs", 1st and 3rd LEDs from the bottom are turned on (digit weights from the bottom
to the top are as follows2°=1. 2
1
=2. 2
2
=4, 2
3
=8. 2
4
=16).
"Start/Pause" is pressed to proceed to the next step:
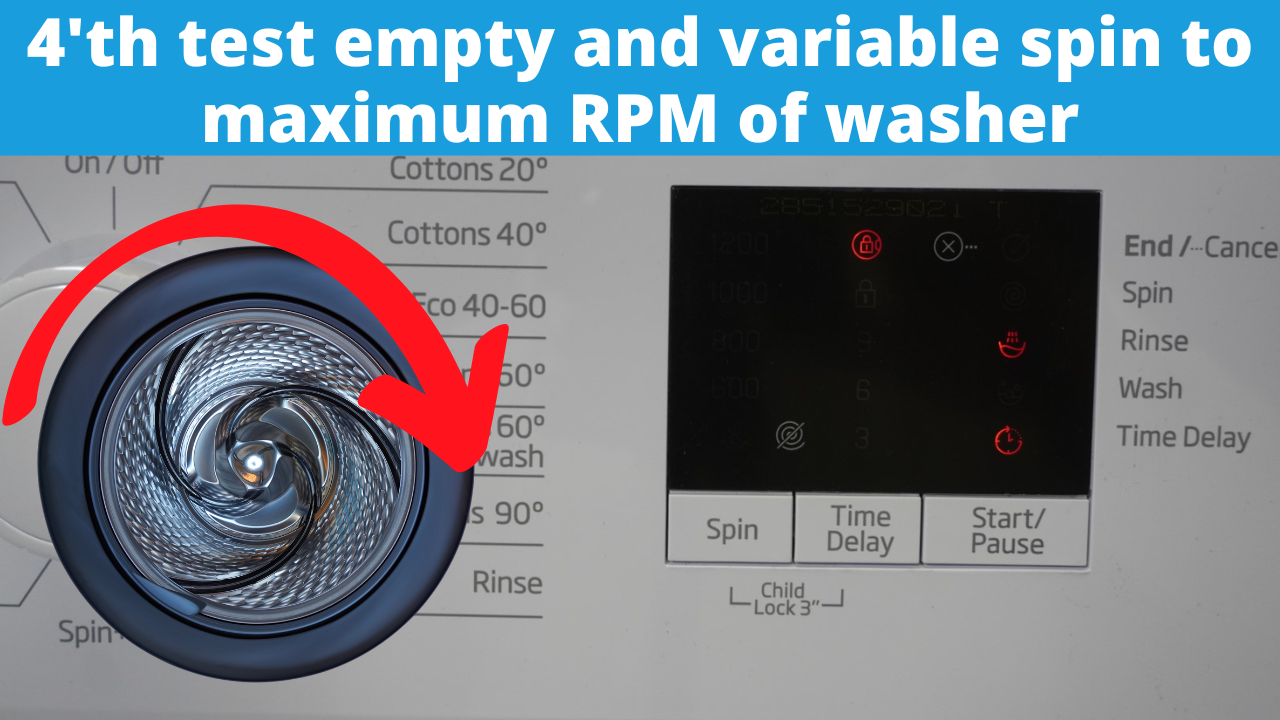
Goes into spin mode on clockwise rotation make sure there are no clothes in the machine before performing this test as the washer will spin at its fastest rpm.
6)
Motor movement in the previous step is stopped and the following checks are done, then the person conducting the test is informed in various ways:
If the Water Level value read from the Water Level Sensoris outside the classification, (if the Water Level Sensor socket is not fitted properly o if there is loose contact), the next
step, which is "7" starts. If the situation is like this, i.e. if there is no drum movement in step 6 and if step 7 starts automatically, the person conducting the test will perceive this
situation as "Water Level Sensor Error".
If the Water Level Value read from the sensor is above the "Safety Level" even though it is within the limits, the pump is operated and once the level has dropped below the "Safety
Level", the main checks of this step are done (drain pump is enabled during this process). These are, respectively,
I. If there is an NTC Error, it is rotated by 100 rpm;
II If there is no NTC error but the values read from the Mains Voltage Reading Inputs (Line_Voltage_ADC) are below 185 Volts or
above 2G5 Volts, it is rotated by 140 rpm. This error might be caused by two conditions: Either the ADC inputs of the microprocessor have broken down or the
mains voltage is in fact outside the limits
III. If there is no NTC error or any other error on the Line_Voltage_ADC inputs, it is rotated with MAX_SPEED /2- "MAX_SPEED"
MAX_SPEED/ 2" (Rev03_28112012) was replaced with MAX_SPEED.
In the meantime, "6", which is the service mode step number:
is shown on the display in 7S models.
For LED models, above the "Start/Pause" key, from the "Programme Follow-up LEDs", the 2nd and 3rd LEDs from the bottom are turned on (digit weights from the bottom to
the top are as follows: 2°=1. 2
1
-2. 2
2
=4. 2
3
=8. 2*=16).
Press "Start/Pause" to proceed to the next test step.
he motor movement started in the previous step is stopped and the pump is turned off. The *PREWASH_VALVE* is turned on and checked, which is the main test of this step.
In the meantime, service mode step number is shown: on he display on "7"
7S models.
For LED models, above the "Start/Pause" key, from the "Programme Follow-up LEDs", LEDs no 1, 2 and 3 are turned on (digit weights from the bottom to the top are as
follows: 2°-1. 2
1
-2. 2
2
=4. 2
3
=8. 2*=16):
"Start/Pause" key is pressed to proceed to the next step.
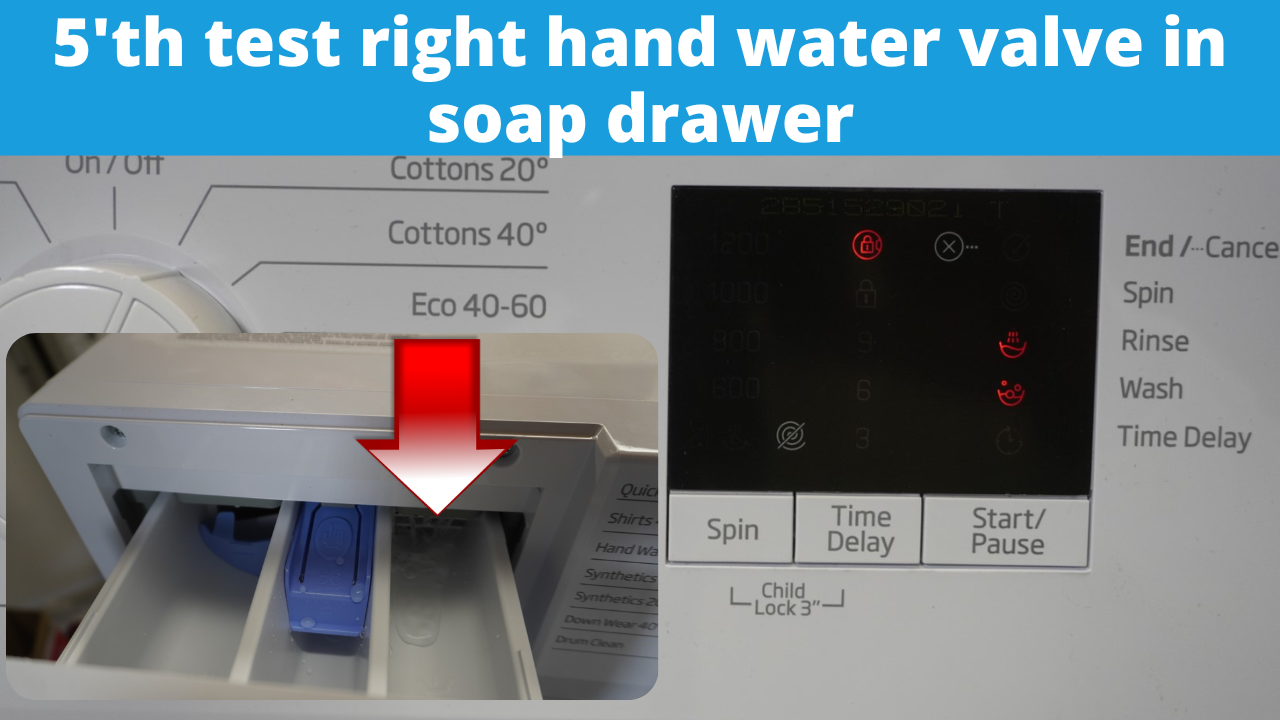
right-hand water valve check soap draw compartment
8)
The "PREWASH_VALVE" which was turned on in the previous step is turned off.
he "MAIN_WASH_VALVE" is turned on and checked, which is the main test of this step.
In the meaintime, the service mode step number "8" is: shown on the display on
7S models.
For LED models, above the "Start/Pause" key, from the "Programme Follow-up LEDs", the LED no 4 from the bottom is turned on (digit weights from the bottom to the top
are as follows: 2°=1. 2
1
=2, 2
2
=4. 2
3
=8. 2
4
=16);
Press "Start/Pause" to proceed to the next test step.
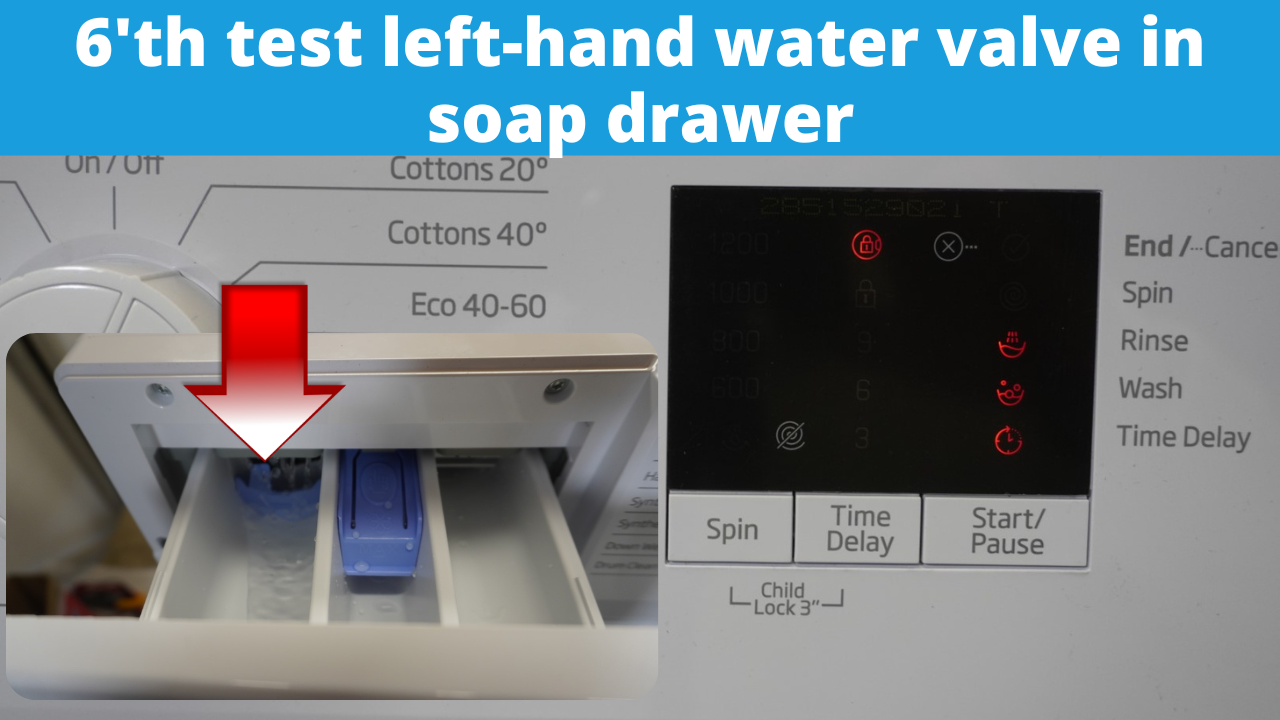
left-hand water valve check soap draw compartment
9)
The "MAIN_WASH_VALVE", which was turned on for testing in the previous step, is turned off.
The "SOFTENER_VALVE" is turned on and checked, which is the main test of this step.
In the meantime, service mode step number "9": Is shown on the display on
7S models.
For LED models, above the "Start/Pause" key, from the "Programme Follow-up LEDs" LEDs no. 1 and 4 from the bottom are turned on (digit weights from the bottom to the
top are as follows:2°=1. 2
1
=2. 2
2
=4. 2
3
=8. 2
4
=16):
Press "Start/Pause" to proceed to the next test step
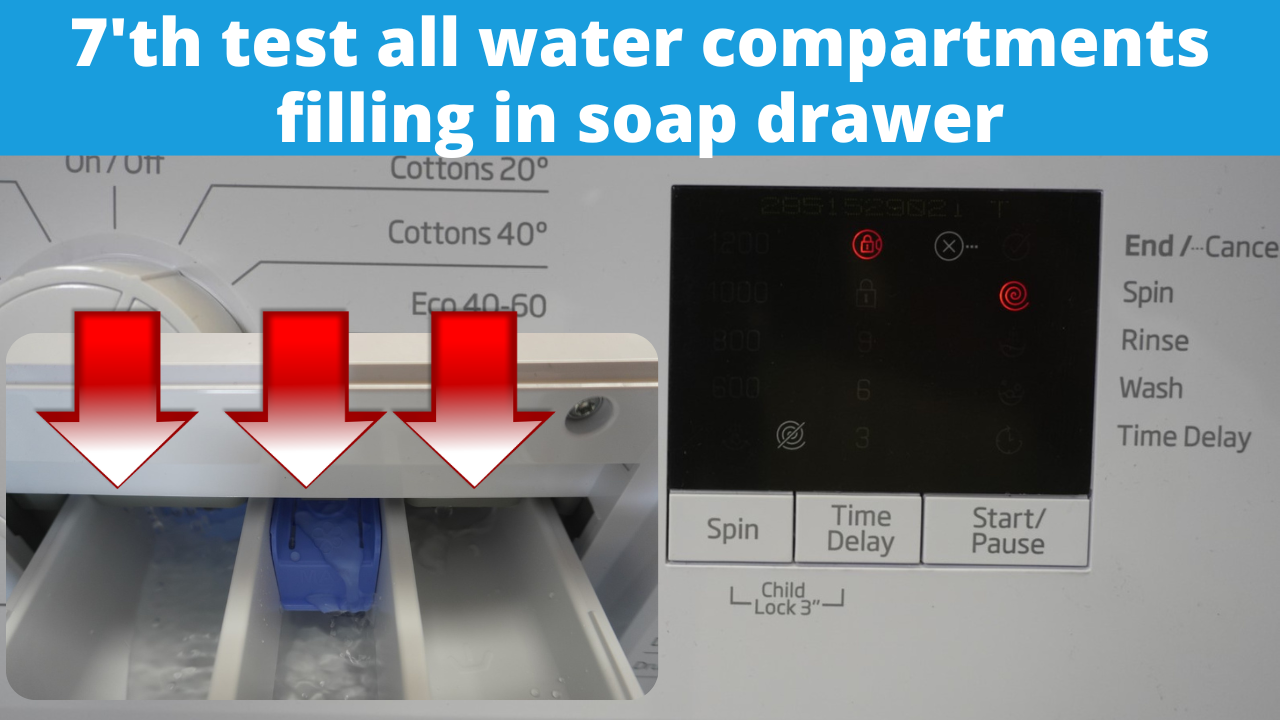
Both water valve are now activated and all 3 compartments will have water flowing in.
10)
The "SOFTENER_VALVE", which was turned on in the previous step for testing, is turned off.
The "HOT_WATER_VALVE", if found in the machine being tested, is turned on and checked, which is the main test of this step (if the machine is not equipped with a
hot water valve, this step is
skipped automatically).
In the meantime, service mode step number "10" is shown:
On he display on 7S models.
For LED models, above the "Start/Pause" key, from the "Programme Follow-up LEDs", LEDs no. 2 and 4 from the bottom are turned on(digit weights from
the bottom to the top are as follows: 2°=1. 2
1
=2, 2
2
=4. 2
3
=8. 2
4
=16):
"Press Start/Pause" to proceed to the next test step.
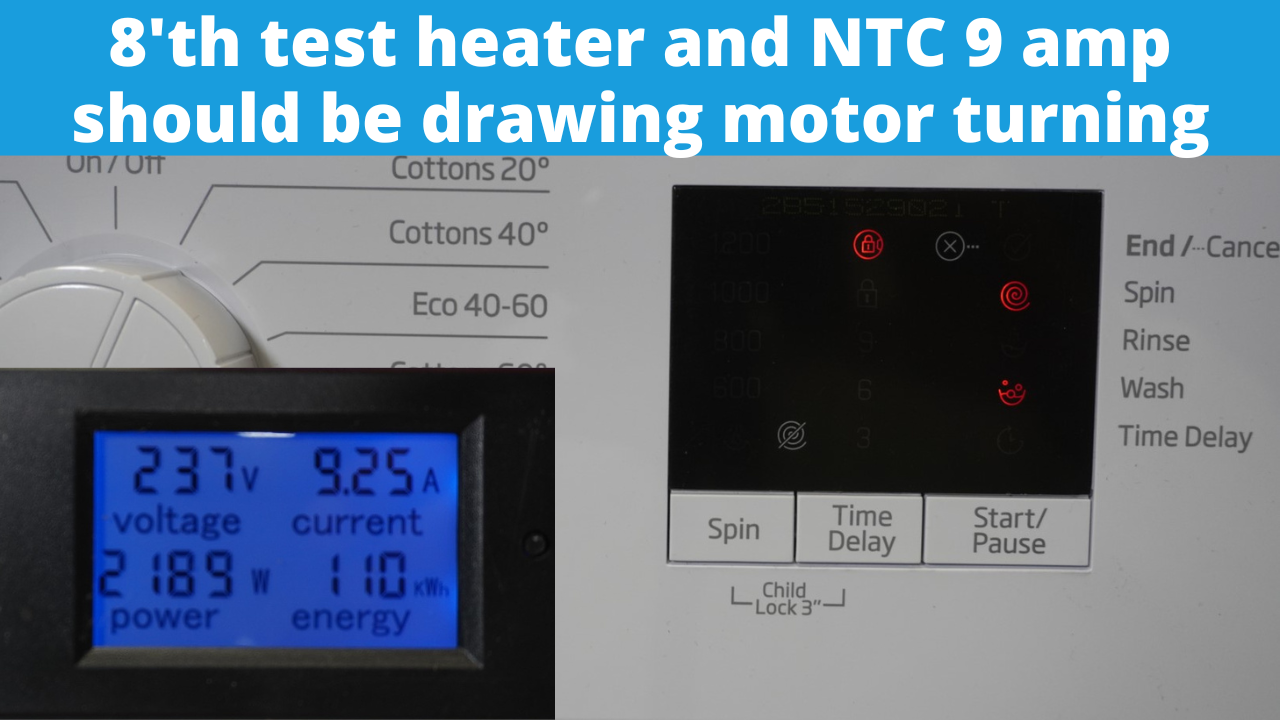
This is the wash and heat test. The machine will heat water and continue to heat and wash clockwise. till cut off time or temp read by NTC sensor.
After it has finished turn the machine off and on this will go back to normal mode.
11)
The "HOT_WATER_VALVE", which was turned on for testing in the previous step, is turned off.
HEATING test, which is the main test of this step, is done as follows:
a) If the Water Level Value read from the Water Level Sensor are outside the limits (if the Water Level Sensor is not fitted properly or if there is loose
contact,) the next step, which is the 12th step, starts. If there is no increase in the current used by the washing machine in the 11th step and the 12th step starts
automatically, the person conducting the test will perceive this as a "Water Level Sensor Error".
(Rev02 07102011):
b) If the water level "Safety Level" is below 20 units even though the values read from the Water Level Senorare within the limits, all valves are turned on
to reach the required level. Once the water level has reached above "Safety_Level+ 20 units", the valves that have been turned on will turn off automatically. After this
stage, there are 2 conditions.
i) In machines without a "Main Wash Flowmeter":
The heaterturns on automatically and turns right by 52 rpm(In the Heater with REVJ34 step, the rotation of 52 rpm to the right was eliminated.) The person
conducting the test checks to see if there is an increase in the current drawn by the washing machine and checks the heater.
ii) In machines with a "Main Wash Flowmeter":
It is checked if the "Main_Wash_Flowmeter" value is above "50". If it is greater than 50, it is assumed that the Flowmeter works correctly, the HEATER turns
on automatically and a rotation of 52 rpm to the right is done. (Models with a flowmeter has motor movement)
If it is smaller than 50, If is assumed that the Flowmeter is faulty, therefore the "HEATER" cannot be driven and the next step("step_12") of the service mode
starts. This way, Flowmeter fault is detected.
In the meantime, the service mode step number "11":
Is shown on the display in 7S models.
For LED models, above the "Start/Pause" key, from the "Programme Follow-up LEDs" LEDs no. 1, 2 and 4 are from the bottom are turned on (digit
weights from the bottom to the top are as follows2
0
-1. 2
1
=2. 2
2
=4. 2
3
=8. 2
4
=16):
Press "Start/Pause" to proceed to the next test step.
12)
The "HEATER", which was turned on in the previous step, is turned off. Moreover, the motor movement started in the pervious previous step is ended and all valves
are turned off.
The "PUMP" is turned on and the water inside the washing machine is drained down to a lower level of the "Safety_Level', which is the main test of this step. Once the
water level has dropped below the "Safety_Level", the pump is turned off.
At the beginning of this draining process, MAIN_WASH and HOT_WATER valves are turned on for 5 seconds (Rev01_22072011)
In the meantime, service mode step number "12":
Is shown on the display on 7S models:
For LED models, above the "Start/Pause" key, from the "Programme Follow-up LEDs" LEDs no 3 and 4 from the bottom are turned on (digit weights from the
bottom to the top are as follows: 2°=1. 2
1
=2. 2
2
=4. 2
3
=8. 2
4
=16):
Since this is the last step of the service test, if you press "Start/Pause" again, the machine will return to the 1ststep