Printed Circuit Board Repairs for Tumble dryers AEG, Electrolux, Zanussi Etc

Even if you’re not a technician or an engineer, some Tumble dryer printed circuit board problems are obvious. Some common and simple problems can cause a printed circuit board not to work.
A thorough visual inspection of your tumble dryer PCB could save you having to buy a new board they can cost over £150 plus a needless engineers bill. Don’t be afraid to have a look. Just make sure your power is turned off to make sure you don’t get an electric shock.
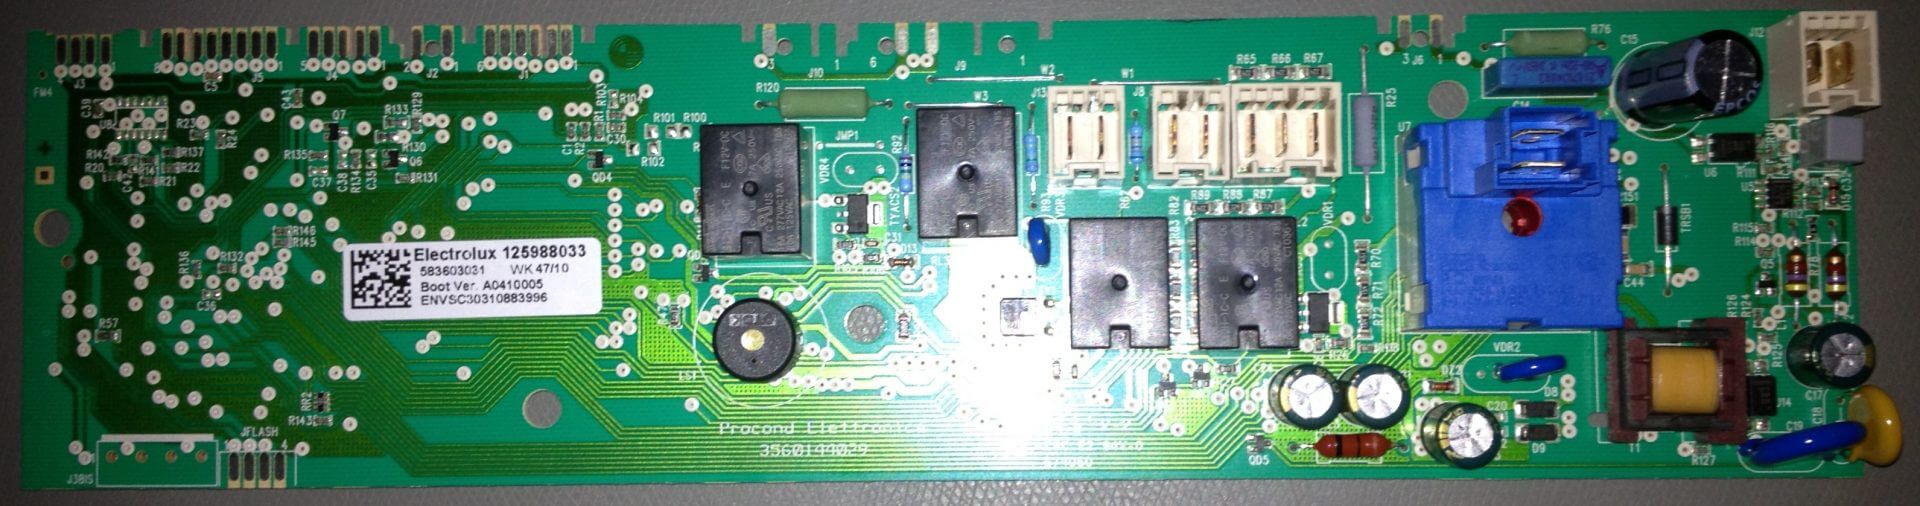
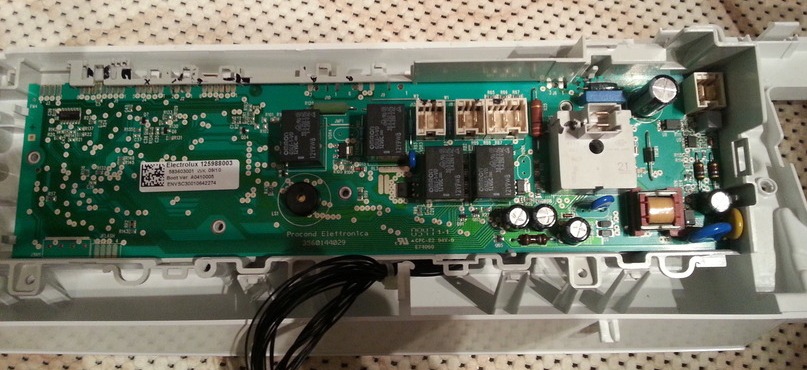
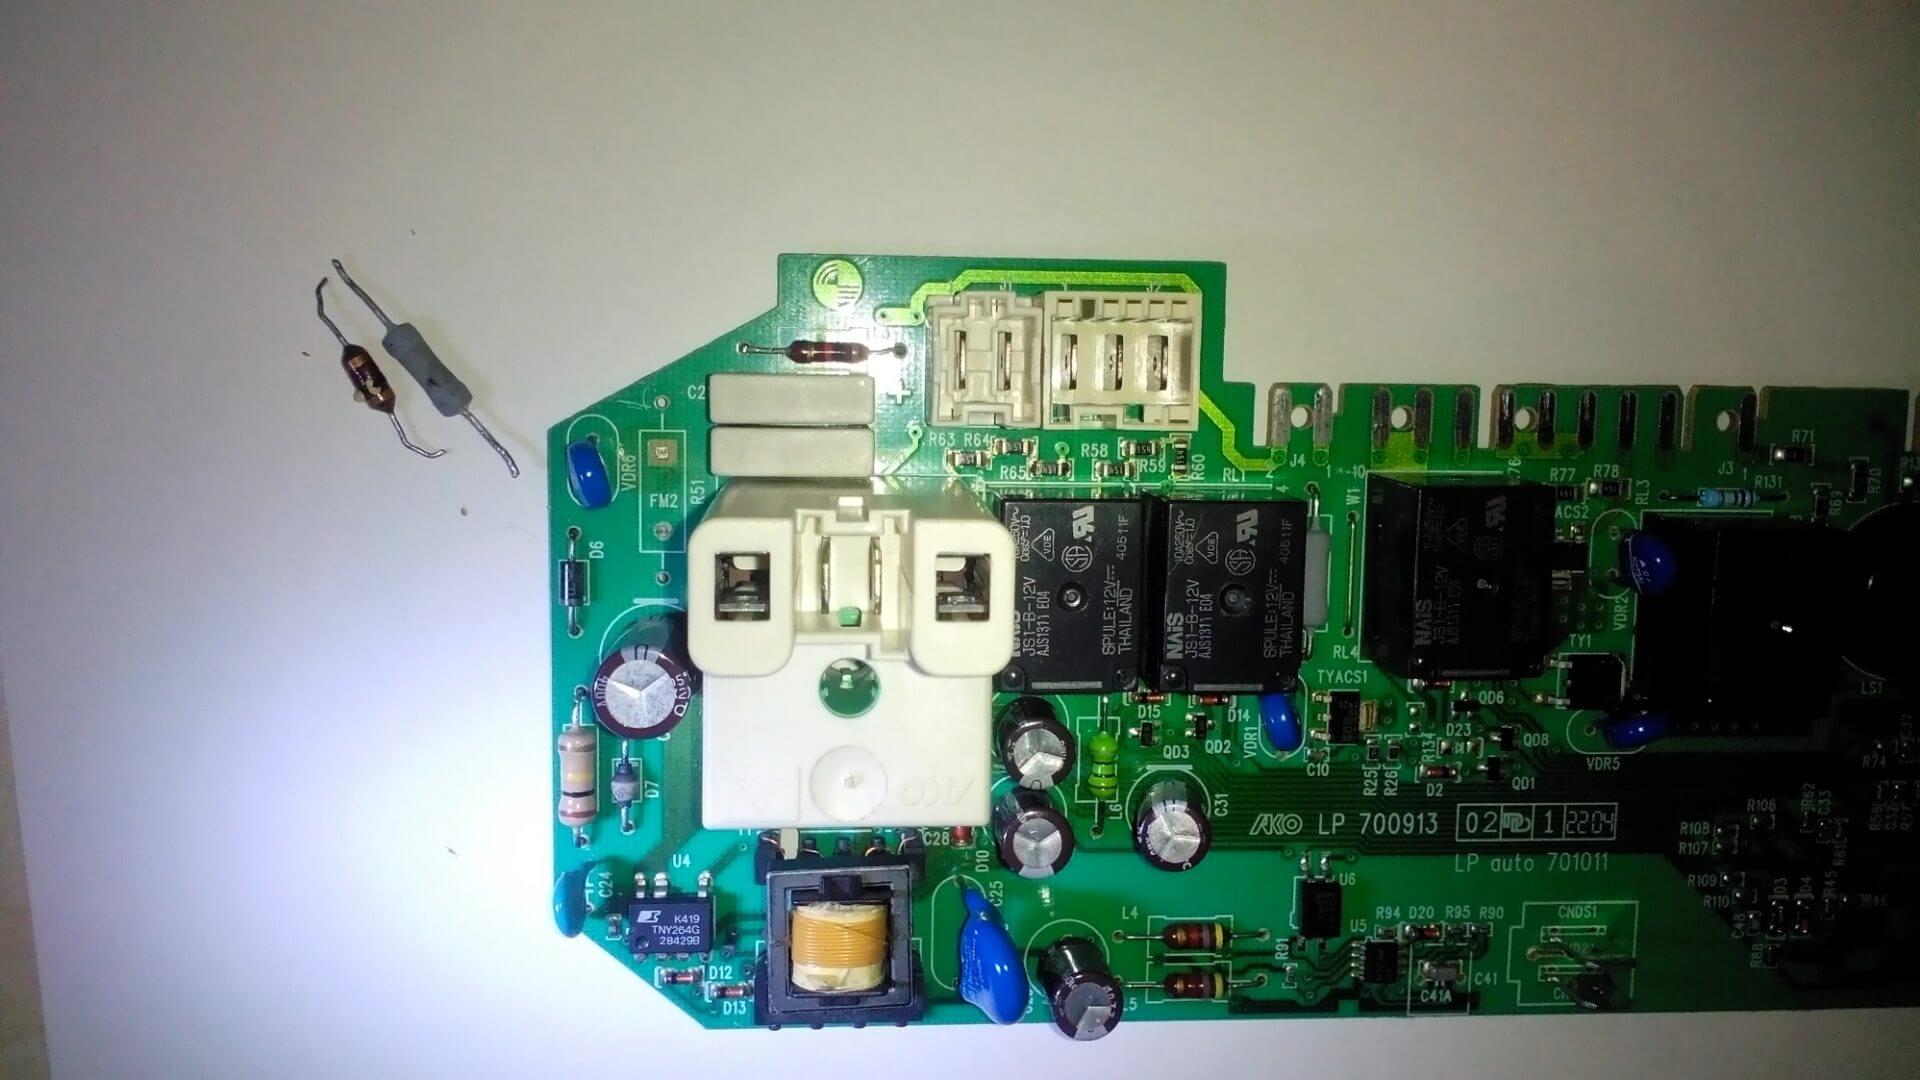
The front of a Printed circuit board Env 06
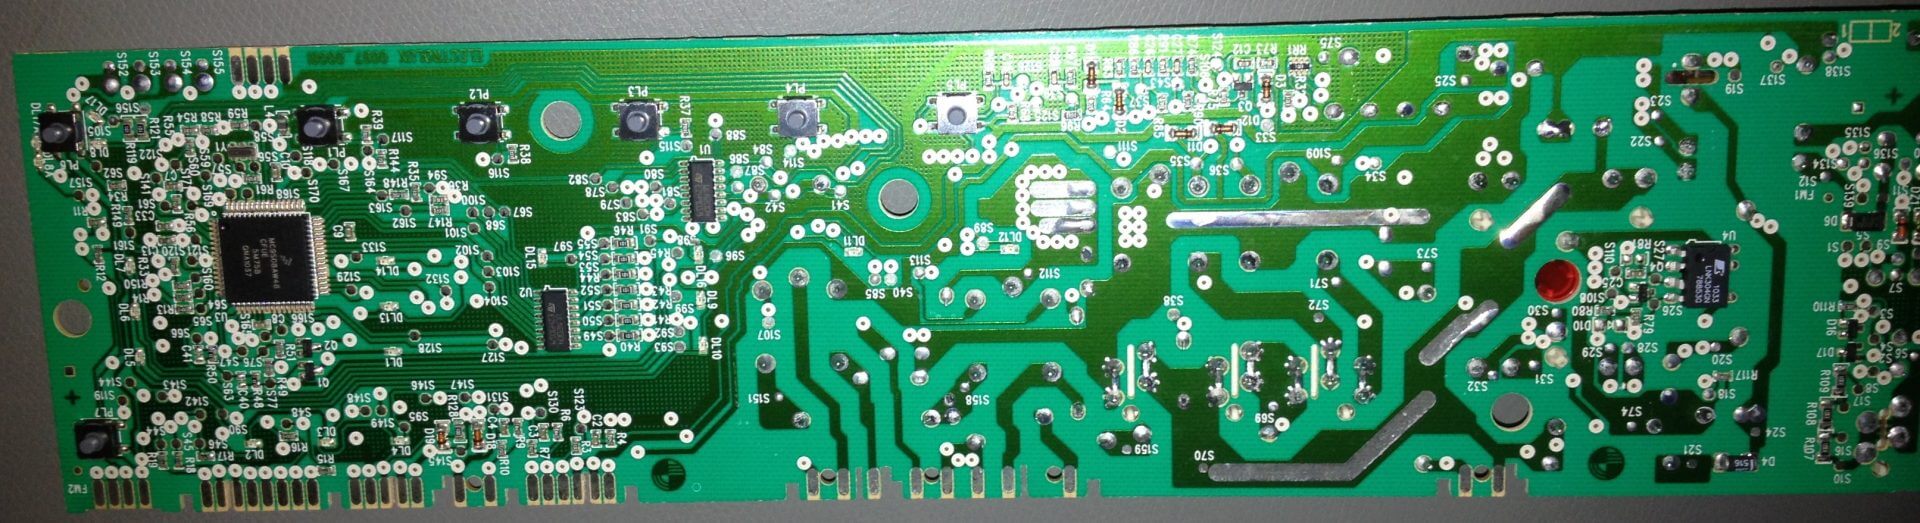
The back of a Printed circuit board Env 06

A typical blown track on a tumble dryer
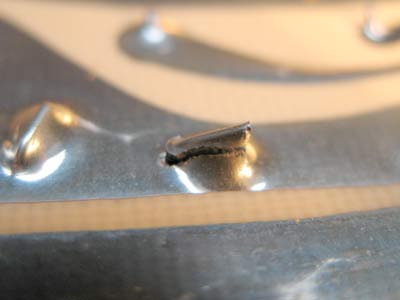
Look out for Dry joints
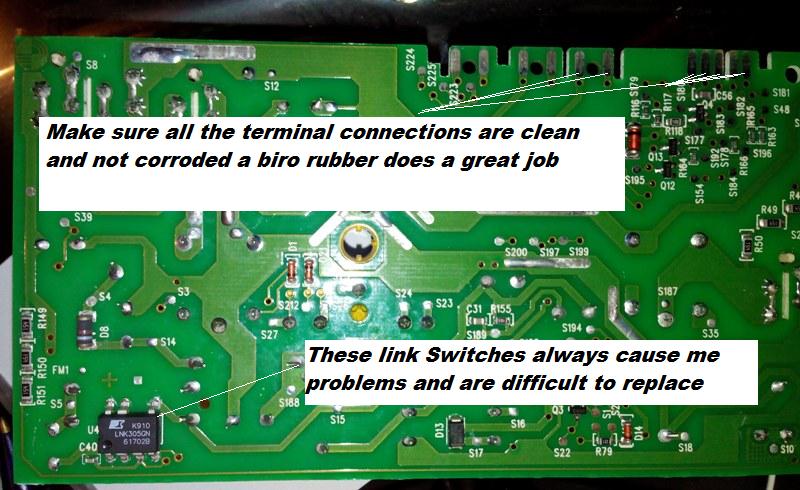
Make sure all the terminal connections are clean and not corroded a biro rubber does a great job

Look out for burnt joints

A typical blown track on a tumble dryer


71 Responses to “Printed Circuit Board Repairs for Tumble dryers AEG, Electrolux, Zanussi Etc”


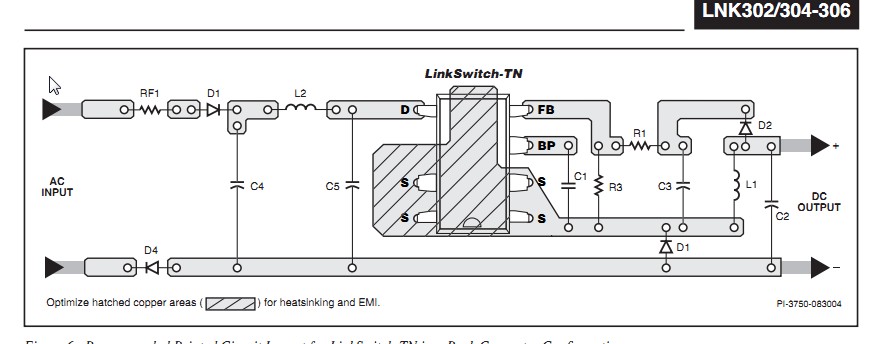
Hi – thanks for your great information ! My Mum has a Bosch dishwasher with a blown input resistor that feeds AC to the LNK304 surface mount IC.
The input resistor is blown / cracked and I can’t properly ready the colour bands to work out the replacement value (I don’t think the value is *that* critical and should be abel to find something via the LNK304 datasheet). The LNK304 chip doesn’t look blown but it is probably what has caused the input resistor to fail.
Do you have any recommendations on the resistor value ? I am thinking 47 Ohm 3W or 22 Ohm 3W. I have linked a couple of pictures. I had already cut out the resistor ready for desoldering.
Happy to buy you a buy through your website if you can help !! Cheers
Oh – and not sure if the fact we are on 240VAC here rather than 110VAC makes a difference to the resistor value ?
iam sorry i cant make it the colours out we need to find someone with same board to match it.
Appliances Engineer
I’m not covering the Iranian Morteza Hi I’m over my bucket repair automatic washing washing machine repair training I was looking for but could not find the site I found you. If your washing machine instruction file to the e-mail you send for me thanks
Hello friends, i have a pcb fault.. the trouble is the r3 r4 r6 r7.. of this resistor i don t know the value. Can you post a photo of this part? Thank you
hi, we need to see a picture of your board first.
I have the same board as shown in the video above in electrolux dryer but a different issue.
Simply I do not get any power at all when turning on the dryer.
I have checked and I have the power in the connector to the boarrd but then nothing more happend.
I suppose I have an component issue on the board since I do not get any power, but where should a start to check. I do no see any obvious when checking the manually
Do you have any advise where to start search?
Thanks very much for the precious instructions!
I replaced one 4.7uF/450V capacitor and the IC LNK306 from the power PCB of an Electrolux tumble washer LTE12F and the no power problem was solved!
The PCB was covered with a thick layer of silicone and to remove the components without damaging the board was not so easy to do.
hi Paulo iam glad i could help you
Appliances Engineer
Hello, I have A frigidaire Dryer with E68 code. I do not have a stuck button but the dryness button isn’t functional. I would like to add a 10k resistor pull down to ground on the other side of the button. I have fixed a few circuit boards in my day and feel confident I could repair this one,. Could your send me a diagram or picture of where the resistor should go. Thanks you so much.
when you have a question please use our contact us page for 24 hour response https://how-to-repair.com/help/contact-us/
Appliances Engineer
Thanks for explaining.
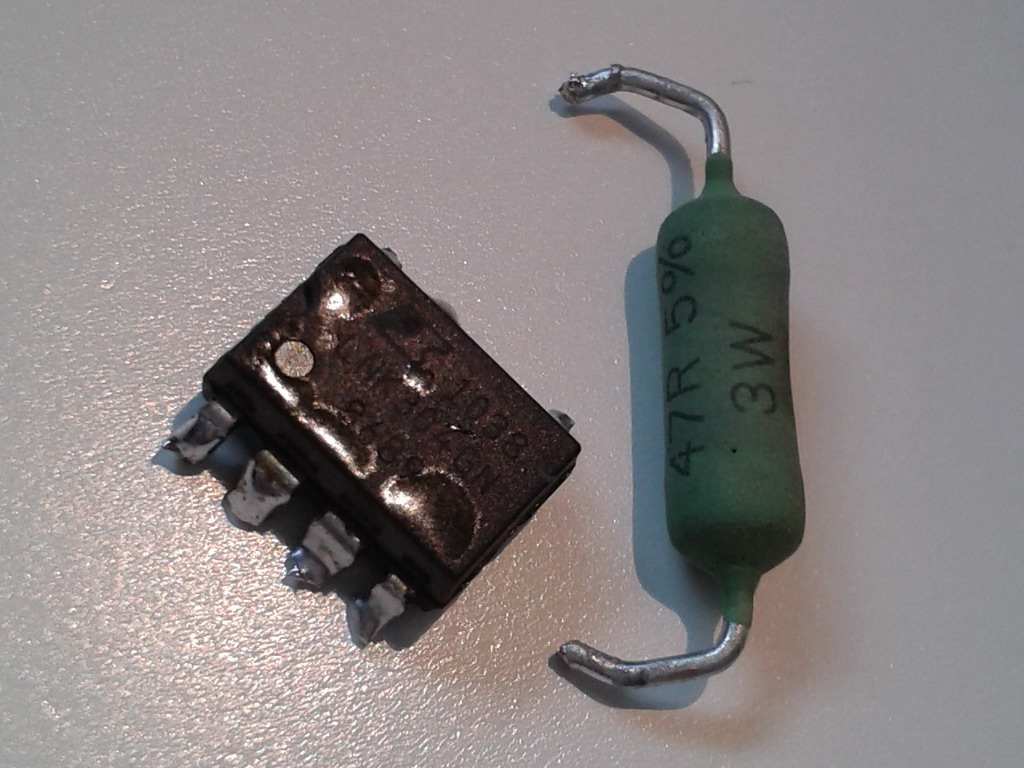
After 5 years my 47 ohm fusable resistor is split in two and the lnk624 is broken. I don’t have or see an inductor.
Some other site suggest to replace the resistor with a higher version. So 33 -> 47 and 47 -> 100. This to prevent the same thing in the near future.
The reasoning is that the chips can’t handle spikes on the net very well and a higher value will protect the chip.
What do you think? Is this best practice to fix a design flash or a potential fire hazard?
hi i have a electrolux edc68555W that does not want to turn.
i kan select the drying program but nothing happens i do hear a relais clicking (alternating relais i suspect) from time to time but machine does not turn. after reading about the diagnose menu i have error code of 5 red lights and 14 green after i do diagnose step 2 (second position of the selector switch (pump test) can anyone tell me what this error is as E514 does not exist.
rgds
Spot on, you are a life-safer. Cheap electrolux with no lifesign at all but the same resistor and switch-IC showing signs of short circuit.
I nave the esame problemi with a rex dryer solarex , the first time i have changed the lnk304 with the lnk304pn DIP , the second time was opened the resistor 4,7 ohm 2watt , now , i can’t find the trouble , bit the board si dead , i don’ t understand the values of d5 diede UM18 band TSRI diode , the board si the same of your photos ,one phase arrive just the lnk , but the other stop at little driver AC SMD mps108 , in apparence , alla parti check are good , resistors , big condenser , anyone nave a schematic of this main board ? thanks for yr helps .
Thanks at all , i hope in yr help ! Stefano
Hi Paul,
I have an electrolux EDI97170 which needed the resistor + LNK fix. However, now it shows EC7 or ECO depending on the selection. I’ve seen that EC7 could possibly mean a connector issue related to pump (or wiring or the pump itself). Do you know which connector is that? (I could not find the service manual to identify the correct connector). Also, since this is for a pump.. do you know which relay may be related to the pump? (thinking out of the possibility that the relay needs replacement).
Thanks!
My machine is a Zanussi. It is completely dead. Nothing goes on. I found somewhere else that the powerpart on the print need to be replaced in that case. What are they?
Good day,
I have this circuit board and the 47 ohm fuse was burnt exactly as per the example shown, only difference is yours was cracked and mine was burnt. Cannot make out the values, but I can see from yours it is 47 Ohms, 5% tolerance and 3W. As I look to purchase, there are still many combinations (including Voltage/element type (i.e. ceramic, metal film etc) that I do not know what is important. This is for a UK AEG 240 V unit. Appreciate any advise to ensure I select the correct resistor.
Many thanks!
sulla scheda lp712236 vorrei sapere il valore dello zener con sigla dz2 grazie.
Hi
is the resistor with tag 47R is 47 ohm or 4700 ohm.
in the video mentioned 4700 ohm
thnx for the instruction Paul, U just saved me about 600 Euro’s for a new dryer.
funny detail : my electronics shop assistant just said “hey, dead tumble-dryer, right?” when i only asked for the resistor and IC, so it is a very common issue..
Thank you for this information it was very helpfull for me. I have AEG dryer with the same circuit board like on the picture. One day my dryer stoped and couldn’t turn on. So like you wrote I opened it and take a look at the board. So the resistor 47Ohm 3W was burnt and I have chaged it with the LNK 304GN and now it is working. One more time , THANK YOU!!!
What a lifesaver. For a fiver, I got my John Lewis dryer working again. LNK304 IC and resistor replaced.
The most difficult part was taking the machine apart to get the PCB out; then remembering where all the screws went on reassembly.
Hello Friend, I have the same board as shown in the video above in Zanussi dryer but a different issue. I tried to replace the belt after when I powered the Dryer to discovered a component TY1 blown. Unfortunately, I cannot see the component Value to look to a replacement the the local Market here. under the Relay RL1, I discovered small burnt. Can you please help to confirm the value of component TY1.
I will appreciate any additional information.
Thank you and best regards.
Hello Paul,
My 4 years old Electrolux EDP2074PDW died, the electronics board 136610230 has multiple bun parts on the low voltage entrance: fuse resistor, LNK364GN and others, but what is difficult for me to find is the trafo close to LNK364GN. Do you have info regarding this part: order code, specs of it?
Regards,
George