


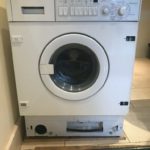
NEFF V4380 washing machine Motor no longer moving the drum
PaulI am in Edinburgh, Scotland and have a 10 year old NEFF washer/condenser dryer Model V4380 (an integral appliance) which has stopped moving the drum, mid cycle. Everything else still works but the motor will not move. I can move the drum by hand and it has the normal slight resistance you expect so I feel the belt is not broken.I saw your video on YouTube (https://www.youtube.com/watch?v=yGdQ4VA-yw8) and think the problem is the carbon brushes. Is it worth me diagnosing that first before I order replacement brushes or even a replacement machine!I think pulling the machine out and finding the model number is necessary here but I hope to be guided by you.If you wish to chat this over my number is ***********Thank you in advanceDuncan Watson
Duncan Watson

Paul answers
I will try and help with this problem Neff v4380x0gb/11 washer dryer
On this washing machine, the motor back half (end cap) is changeable, but if you are very technically minded and I able to use a soldering iron you will be be able to replace the carbon brushes this is a painstaking process, I have not got a video on your specific motor yet but I have put a video below to show you how we fit carbon brushes into other Neff washing machines and also a video to understand what you need to look for on the Armature this is to check there is no damaged
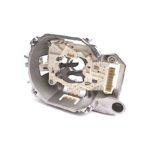
Neff end cap motor with brushes
Duncan Watson response
Paul
Thank you for your help in diagnosing the fault and suggesting the repair. I thought it might be helpful for you to know what I did and the issues I encountered so you can help others. This NEFF V4380 washer dryer is well worth repairing but it is good to know you don’t have to shell out for a replacement motor.
I bought replacement brushes which are simply the carbon rod with the copper wire attached at the lower end of the rear. There is no spring included nor are there any electrical terminals. However the way that the wire is attached makes it very easy to know the right one to use and its orientation.
Removing the motor was easy. Firstly, I isolated the mains at the trip switch and pulled the machine out from under the kitchen surface to access the back of the machine. You only need to remove the back panel of the machine, not the top panel. In the back panel there are two plastic clips, large enough to accommodate a European electrical plug, which clamp the panel to a central horizontal brace. That brace is bolted on and does not need removed. You slide the plastic clips out and that releases the panel, once you have removed the 12 or so screws first!
Once in there, the motor is held by two bolts. One allows belt tension adjustment, the other anchors it. The belt tension bolt head can be seen and is easily removed. The other bolt cannot be seen as it faces away from you but you can easily access it blind and unscrew it with a ring spanner. Remove the drive belt too. Unscrew the earth wire which is attached the end cap of the motor.
The motor can then come slowly and carefully out of the machine through a gap that is just big enough! Once removed it is still attached by a mass of wires. It also has a plastic water shield. Take note of how that is attached (photos are best). The electric wires feed to a blue connector which has clips that need pressed to release this block from the motor, rather easily. The wires are also tidied up with two cable ties. Take note of them and carefully cut them to release the wires. One of these holds the plastic water shield in place so you have to do this first! Then take the motor to your work area. Protect that area and be prepared for lots of carbon dust and filthy fingers.
The end cap is held on with 4 very long bolts that need a 6 pointed star screw bit. Note how the cap is orientated (photos again). Once these are loosened, the end cap can be easily removed but be sure to set the motor with the end cap pointing upwards as the motor will quickly will fall apart once that cap is removed.
Inside the cap is a rectangular circuit board covered in plastic where the brushes are underneath. This is held in with 4 star screws too. Remove them but again, note the circuit orientation.
Turn that board over and you see the springs pushing the brushes. These can be gently pushed back and held at the upper edge of the brush housing to keep them out the way while you work. There is one plastic cover on top of each of the brush housings. Keep them safe.
One of my brushes was worn more than the other but both needed replaced. The length of the old brush wire is the extent stop which means they go no further when wearing out. This is significant as the replacement brushes have double that length of wire so are far too long. Do not cut them down to size.
The existing wires are not just soldered onto the circuit board but seemingly welded! They are connected twice too. Once at its very end and once at the right distance to stop the brushes wearing too far. In my opinion, they could have given them a bit more play.
Replacing the brushes, one by one is easy but the wire length and its welded attachment was causing concern. In the end I snipped the old worn brush head off leaving its full length of old wire. Then I put the new brush in, feeding the new wire first and then wrapped the new and old wires together knotting them and then packing it down on the connections area. I did not de-solder the old wire. I also made sure the new wire had a length limit for the brush to wear down to just reaching the wire within the brush at the motor end.
It is important to note the end cap is metal and so electrical conductive. Keeping the brush wires away from it is vital. That is why I forced it down on the circuit area as best I could.
Once both brushes are replaced, it is ready but I then used a soft kitchen hand brush and brushed away as much of the carbon dust from both sides of the circuit board, from inside the end cap and from the motor area, being very careful not to up-end that as it is very fragile without its end cap. The motor was where most of the carbon dust landed once it was placed on its end. There was talk online that the commutator might need cleaned but it looked fine to me so I did not touch it.
Once it looked a lot cleaner, I placed the two plastic covers upside down into the end cap where they protect the brush housing. Then I reassembled the circuit into the end cap with its 4 screws. Then I put the end cap back onto the motor, carefully holding back the brushes with a thin screwdriver as my finger was too fat to do that, as I was placing it onto the spindle. Once in place, I partially tightened the 4 long bolts and when I was happy it was all snug, fully tightened them up. I then used that screwdriver to ping the springs back in place pushing the rear of the new brushes against the motor.
With the motor now fixed, it was ready to go back into the machine. You need to re-attach the plastic water shield and the blue wires connector. Then you carefully feed the motor back through the gap into the machine and hook it onto the anchor bracket. Lightly put that bolt back on, finger-tight. Then you pivot the motor up and lightly place the other bolt in, to hold it. You then need to reattach the earth wire to the housing and put two new cable ties on to hold the wires back from where you snipped them before. As they have been bent in that position for years, they happily go back into that shape. Make sure you snip off the extra length of the cable ties too.
Then put the drive belt back and adjust the tension to very tight. Tighten that bolt you can see to retain that tension. Then tighten the anchor bolt you cannot see to very tight too.
At this point you can test the machine. Luckily, the two water feed pipes, the waste pipe and the electrical main wire were long enough that they were still connected even though the machine was out so I switched the mains back on and put the machine through a de-fluff cycle. That takes in water, swishes it about then expels it. It was a joy to see the motor moving the drum.
Once that cycle was done, I re-isolated the mains and put the back panel on again making sure I had no bits or screws left over!
I wrestled the machine back into its recess area and did another de-fluff cycle to check for leakage and adverse noise. Then I put a normal 40C wash on with a 40 minute dry cycle. There was a slight rubbing noise in the first part of the wash cycle but that eased off once the machine had a good shake on its first spin. It has sounded normal ever since.
I hope that helps you with creating a video for this process. As I say, the machine is an absolute workhorse and well worth repairing but it is good to know that you do not need to buy a new end cap (£50) or a new motor (£220) when a pair of £5 carbon brushes are all that is required plus 3 hours of your patient time!
Thank you for your help
Duncan Watson
If you need any further assistance please feel free to contact me. all the best Paul.
 |
Paul Charmbury
Appliances Engineer     |
Neff v4380x0gb/11 washer dryer full list of spare parts for this model below
Our How-to-repair stores